
This guide covers fitting the "Stage II" Eaton M62 supercharger kit to the Z22SE engine (the NA), concentrating on the VX220. It was written by Chris of Type 116 Motorsport in September 2010. It is a long job, so the steps below are grouped into stages. For the exhaust side see Supercharged exhaust advice, and for a fault-finding case on a modified supercharged car see Supercharged no-start and hesitation.
Parts list
The guide lists everything below and says you may still need the odd bolt that was forgotten. The original has a cost column, but it is blank.
Supercharger
- Saturn Ion/Cobalt SS supercharger (Harrop LSJ). It will need a big pulley at stage 2.
- Saturn Ion/Cobalt SS inlet manifold.
- Gasket, supercharger to inlet manifold.
Supercharger ancillaries
- Inlet manifold support bracket, and a gasket for inlet manifold to head.
- Inlet manifold alignment bungs x2, and four bolts for charger to inlet manifold.
- MAP sensor, on/off boost blank, auxiliary tensioner, and belt.
- Z20LET injectors, Bosch injector plug sockets with pins x4, and plug socket covers x4.
- Large cotton gauze filter (70 mm internal diameter), a long silicone pipe for the filter (300 mm x 70 mm) and an alloy joiner for the air filter (70 mm).
- Bolts: M6x80 x2, M6x40 x5, M6 washers x7, and M8x140 x2 for the alternator tensioner bracket.
- Fused 4-pin relay for the charge cooler pump, and a dipstick relocation bracket.
- Breather filter, jubilee clips (60 to 80 mm variety x3, 20 to 32 mm variety x3), EGR blanking plate, loom tape, a Corsa top hose, and 250 mm of 3 mm internal diameter silicone tube (for the fuel pressure regulator pipe).
Charge cooler
- Large pre-rad (Pro Alloy, dual fans).
- Dual pass mod (recommended).
Charge cooler ancillaries
- 50 mm grommets x2 and a Bosch 12 V charge cooler pump.
- 9 m of hose, 90 degree elbows for the hose x2 (3 if dual pass), a Y piece (if dual pass) and straight joiners x3 (only 1 for dual pass).
- Jubilee clips, 40 to 60 mm variety x12.
- Charge cooler header tank, an alloy joiner with an offset temperature sensor socket, and a temperature sensor for the fan mod.
Extras
- Charge cooler header tank (Pro Alloy).
- Saturn Ion/Cobalt 2.0 SC throttle body.
- 5 litres of coolant (GM antifreeze, red/orange).
- EGR cheater, oil catch tank, and a 100 amp alternator.
Before you start, get a decent set of tools. The author suggests a couple of ratchet spanners, which save time and skin.
Stage 1: front end and pre-rad (steps 1 to 6)
- Disconnect the battery: pop out the washer bottle and use a 10 mm spanner on the terminal. See Flat battery and charging system.
- Remove the front lights. He thinks a 13 mm spanner is needed and says the ratchet type works well. Make sure all the wires are disconnected.
- Remove the front clam, so the pre-rad can be fitted for the laminovas in the supercharger manifold. See Front clam removal.
- Unclip the two hoses either side and drain the coolant from the system, then remove the radiator cover. The bonnet can stay on, which saves re-aligning it later.
- Mount the pre-rad. The larger Pro Alloy one sits directly under the original radiator, and you will have to cut away part of what the radiator sits on.
- Attach the pre-rad to the radiator with 5 mm or 6 mm C-clips.
Stage 2: charge cooler pipes through the sill (steps 7 to 13)
- Take the black sill cover off the driver's side: one plastic screw at the front and one at the back on the side, then prise the cover off carefully.
- Refit the radiator cover, drilling two holes in the side for the new pre-rad pipes to stick out.
- This leaves a hole under the sill, which makes it slightly easier to feed the pipes to the rear. You should be able to get your hands in; if not, cut a little fibreglass away.
- Decide where to drill the two holes the pipes will pass through, looking at pictures first. He can't give the hole size. Try the grommet in cardboard to check the hole is big enough for it to sit without being squashed, and that you can rotate the grommet so the pipe goes through easily.
- Remove the parcel shelf: take the passenger seat out completely, pull the driver's seat fully forward, and unscrew the plastic bolts dotted around. He removed the seatbelt runners at the top to make it easier.
- Remove the rear clam, loosening the top roll bar cover if you have turbo vents. If you don't, you can angle the clam down and slide it under. See Rear clam removal.
- Thread the pipes through the sill. He pushed a length of 13 mm plastic pipe down the sill through the foam until it showed at the sill hole, drilled a hole through it and the charge cooler pipe, and tied them together with washing line. One person pushes while another pulls, and washing-up liquid helps. If you have one long piece of pipe, don't cut it yet: push each end through to the back so you have a loop at the front.
Stage 3: ECU, intake and fuel (steps 14 to 19)
- Remove the ECU, if not already done. You will need to drill out the security bolt, or find a bit that fits. It then goes to Courtenay Sport for mapping.
- Remove the intake system, aftermarket or not. Keep it for later.
- Remove the throttle body (4 x 10 mm bolts).
- Remove the intake manifold (5 x 10 mm bolts and 2 x 10 mm nuts). Put gaffa tape over the holes so nothing falls into the head.
- Remove the fuel rail: undo the 2 x 13 mm bolts on top and the 2 fuel lines, then lift it off. It is easier to loosen the fuel lines by taking them off the head.
- Remove the injectors, taping up the holes as with the manifold. Keep the clips. There is a small o-ring at the bottom of each injector, so make sure none comes off and ends up in the engine.
Stage 4: alternator and manifold (steps 20 to 24)
- Check the alternator. You need a 100 amp one for the supercharger to fit, and a suppressor for it. The positive feed bolt and nut must be ground down so they don't foul the manifold. The manifold is metal and earthed, so a touch would be a direct short to earth. Fit the new belt pre-tensioner now, as the 120 mm bolts won't go into their holes once the alternator is mounted. See Alternator belt.
- Undo a couple of fuel line holders at the back of the clam, so the lines are easier to hold out of the way.
- Remove the EGR valve and fit a blanking plate, since the EGR isn't needed. You can leave the valve in place, but it looks worse. See EGR valve replacement.
- Fit the supercharger manifold, once the alternator is correct and the suppressor is fitted. You can fit the manifold's mounting bracket and then the manifold itself permanently. The gasket needs modifying, and the author refers you to the supercharger build book for how. If the manifold is second hand, cover the inlet so nothing drops into it. He repeats the warning to keep the alternator live well away from the manifold.
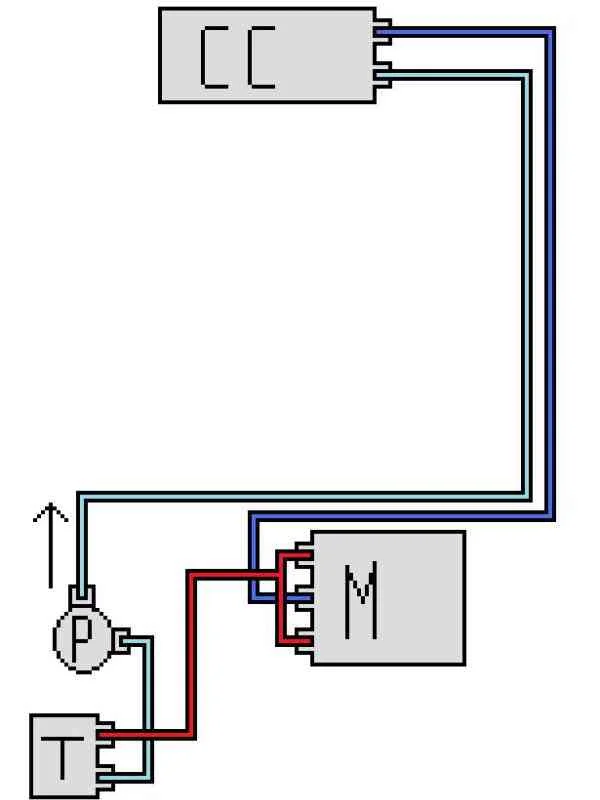
- Run one charge cooler pipe to the top of the manifold inlet (top is water in, bottom is water out). Once it is connected, go back to the front, cut the pipe and connect it to the pre-rad inlet. The next pipe goes on the pre-rad's other outlet and is fed all the way to the passenger side, following the first pipe under the manifold. The pump goes on the end of this pipe, so leave it long for now. With the dual pass mod, this connects to the centre pipe off the manifold, and the pre-rad must be set up for it. The aim is for cold water to come directly from the radiator and warm water to go to the header tank.
Wiring changes
The author says the wiring isn't hard: a few items to extend, and the throttle body plug to re-wire. Mount the ECU where you want it and use that as the guide for how long wires must be. He suggests the throttle body plug should reach the throttle body without extending.
- Extend the 4 injector plugs, the charcoal filter plug, the MAP sensor and the earth wire from the main ECU plug.
- Re-wire the throttle plug, and wire in the charge cooler pump and its relay.
- Install the EGR cheater.
Soldering
- Strip about 5 mm from the ends of the wires to be joined.
- Put the exposed wire in flux (or rub it on with your fingers).
- Put solder on the iron and dab the fluxed wire; it takes the solder quickly.
- Do the same to the other wire, then lay the two wires end to end and put a dab of solder on both to join them.
The jobs in detail
- Injector plugs: do them one at a time. Take the plug off an injector, snip the lead about 10 mm back from the plug so you can still see the coloured wires, and wire the new plug so the wires match the original when the plugs sit in the same orientation. Do all four.
- Charcoal filter plug: snip about 50 mm from the plug. Run the cable along the back of the clam, just under the window. It needs 2 wires, and colour coding them helps fault finding.
- MAP sensor: as for the charcoal filter. Add just enough wire to reach the manifold.
- Earth wire: extend the one wire and mount it to earth. You can find earth points by following the other wires or in the TIS guide.
- Throttle body plug: see below. Not needed with the standard throttle body.
- Charge cooler pump: two wires into a plug, left long, as it is easier to shorten than extend. One is positive (permanent live) and goes to the relay; the other is negative and goes to any chassis earth.
- Charge cooler relay: he mounted his below the plastic header tank, for easy access to the 30 amp fuse.
- EGR cheater: the new manifold has no EGR pipe, so the cheater makes the ECU behave as if the EGR were working. A wiring diagram should come with it. You can cut off the plug and hide the cheater in the loom, but he left his plug on in case he ever needed to put the EGR back.
Throttle body plug swap
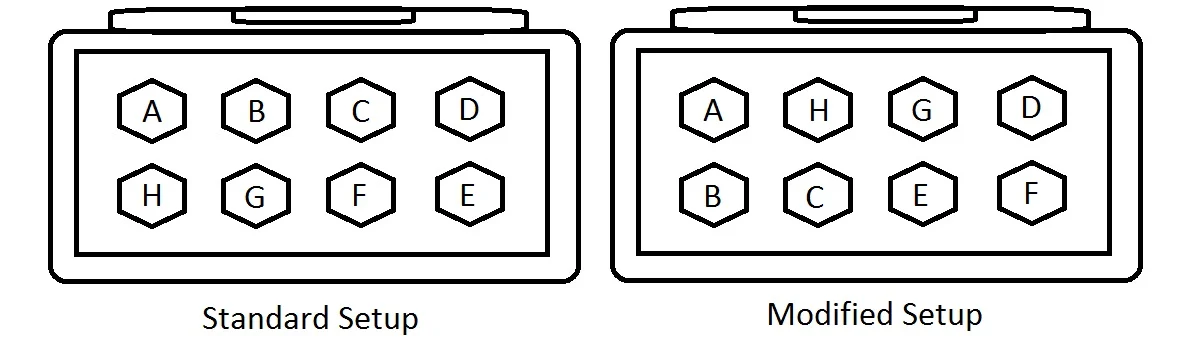
With the purple cover removed, the plug is marked A and D on the front and E and H on the back. Work methodically, as some wires are the same colour.
- Wires A and D stay where they are.
- Swap B and H.
- Swap C and G.
- Swap E and F.
Stage 5: building it up (steps 25 to 47)
- Remove the top water pipe on the cam cover and move it aside. It needs modifying so it doesn't foul the supercharger belt. An extension piece in the pipe is enough, tie-wrapped out of the way.
- Remove the oil breather pipe from the top of the engine and move it aside.
- Fit the 2.0 SC throttle body to the supercharger. A new one should come with its gasket (green, with a little tab); a second-hand one needs a gasket ordered. With the standard throttle body you need an adaptor plate.
- Fit the supercharger onto the manifold (with its gasket) so you can see how far to hold the pipes from the belt. Tie-wrap everything clear until you are happy with the clearance.
- Trial fit the throttle body plug to check the cable is long enough. If not, extend it. He mounted his ECU close enough not to.
- Block the hole in the top of the supercharger by the plug, with tiger seal or the old MAP sensor.
- Fit the brake vacuum hose to the supercharger.
- Either block the hole from the throttle body and leave the stiff black pipe open to atmosphere, or connect the pipe on the throttle body to the stiff black pipe that came off the original manifold.
- Fit the MAP sensor to the manifold. Put a little tiger seal around its orange plug, as it is a loose fit, and use a bracket to hold it in place.
- Fit the 4 new injectors to the fuel rail, using the clips you took off. The new ones have 4 holes at the tip in a diamond or square shape, where the originals had 2. They should all sit at an angle if the clips are on properly.
- Fit the fuel rail with its injectors to the engine.
- Connect the vacuum pipe from the end of the fuel rail to the top of the supercharger manifold.
- Reconnect the water pipe to the top of the engine and check the clearance to the belt. It must not be able to rest on the belt.
- Reconnect the oil breather pipe. He ran his to the underside of the clam and put a filter on it there, which looks more like original.
- Fit the charge cooler pump on the end of the pipe brought through from under the manifold. Cut the pipe to find a good spot for the pump, and keep the rest for later. You can plug in the pump wires now.
- Fit the header tank. One pipe runs from the manifold outlet to the top of the tank, and one from the bottom of the tank to the pump. With dual pass, join the manifold's top and bottom pipes with a Y piece, then run to the top of the tank.
- Modify the intake pipe to take the sensor from the original one, unless you have an aftermarket intake.
- Fit the intake pipe once the piping and pump wiring are sorted.
- Connect the injector wires, the MAP sensor plug, the throttle body plug and the charcoal filter plug.
- Fit the drive belt. He slackens off the new pre-tensioner and the supercharger so the belt goes on without much force. When tightening, bolt the supercharger down first and then the pre-tensioner.
Stage 6: leak test and first start (steps 48 to 52)
- Fill the header tanks with water first, so you aren't wasting coolant if something leaks.
- Reconnect the battery.
- Double check everything: wiring connections, and that nothing touches a moving part.
- Start the engine to check it runs properly and to find any leaks from the charge cooler pipes.
- Refit the clams, lights and the rest. The author doesn't go into detail on this.
His notes at the end
- Courtenay were by then putting a 5,500 rpm rev limit on their ECU maps.
- The engine will rev erratically to begin with. Leave it to settle, and after a couple of starts it should be fine.
- It still takes a minute or two to warm up, so don't thrash it from cold.