
When to replace them
- Vauxhall don't set a life for bushes and ball joints: they are replaced when worn or when they fail an MOT (a 2005 supplier's statement).
- In one owner's 2011 refresh of an 85,000 mile car that had led "a hard life", every ball joint removed was in perfect condition, and only one bush had started to delaminate. He reused the original bolts.
- Another owner (2011) says the labour of getting there outweighs the part cost, so replace wear items while it is apart.
- Supplier claim (2005, not independently checked): on a track the car "eats" lower ball joints, which he says were originally designed for a 1970s Vauxhall Chevette. Treat that as the supplier's opinion.
Ball joints
- The joints are a very tight interference fit in the wishbone. One owner who tried to remove them said the press fit has "big interference", and another says they are a very tight fit. A hydraulic press is the sensible tool.
- Extractor tool. A tool for pressing the joints in and out exists (steel plates made from 20 mm flat bar, in the one owner's case). A supplier says it works but is a lot of hassle: aligning the joint when refitting is tricky, a lot of effort is needed, and the supplier stripped threads using it at a circuit when no press was available.
- Easier route: remove the wishbones and take them to a friendly garage or engineering shop to press out the old joints and press in the new ones (the supplier's advice, 2005).
- Separating the joint from the hub carrier is a different job (a tapered fit). See Front wishbone removal.
- After refitting, redo the geometry. On the front upper wishbones, the correct number of castor shims must go back in.
- Quality. Ball joint grades in 2011: OEM about £25, Delphi-pattern about £15, lower-quality Delphi about £8. The owner recommending these suggested buying from the established Lotus specialists.
- Dated supplier price list (2005). One supplier quoted a full rebuild with polyurethane bushes at £699, adding £379 for powder coating the uprights, wishbones and toe links with eight new Quinton Hazell ball joints (£163 more for Vauxhall OE joints). All prices included parts, labour and VAT, and are only a guide to how things were then.
Bushes: rubber or polyurethane?
- Standard rubber. One owner advises sticking with standard bushes, saying poly only benefits you if you track the car and harshens the ride, though not by a lot.
- Polyurethane (Nylatron, Powerflex and others). Another owner prefers them because they can be torqued at any suspension height. A supplier says poly bushes are stiffer "without being too hard" and that on track with sticky tyres the standard bushes flex enough to move the rear toe from in to out, which he says makes the car oversteer dramatically (his claim).
- Whichever you choose, the choice is not settled in the threads. Owners differ, and the 2011 prices above are the only costs given.
Fitting bushes
- Get the wishbones off and clean. If they are going to be powder coated, the bushes must come out first, since they can't take the baking temperature. See Wishbone corrosion protection.
- Press out the old ones. A vice works. One owner without a vice pressed them out using two sockets and a G clamp, which took longer.
- Press the new ones in with copper grease, using a vice and either a bush tool or a threaded bar. One owner found them "really quite simple" at about two minutes per bush, with the tool from Elise Parts. Another used the ball joint tool pieces from Elise Parts: the large spacer on the back to receive the bush, and the plate with a recess to push it in, in a vice with a two foot bar for leverage. He found this much better than a socket.
- Make sure they go in the right way round (see below).
- If an OEM rubber bush won't go in flush, one owner who struggled (even after freezing the bushes for several hours) found the press was bearing on the outer plastic sleeve, which distorted and bulged for the last couple of millimetres. A stack of about six washers, a bit smaller than the press, put the force on the metal parts of the bush, and then they went in. Another owner says you need to over-press them by a few millimetres.
Which way round
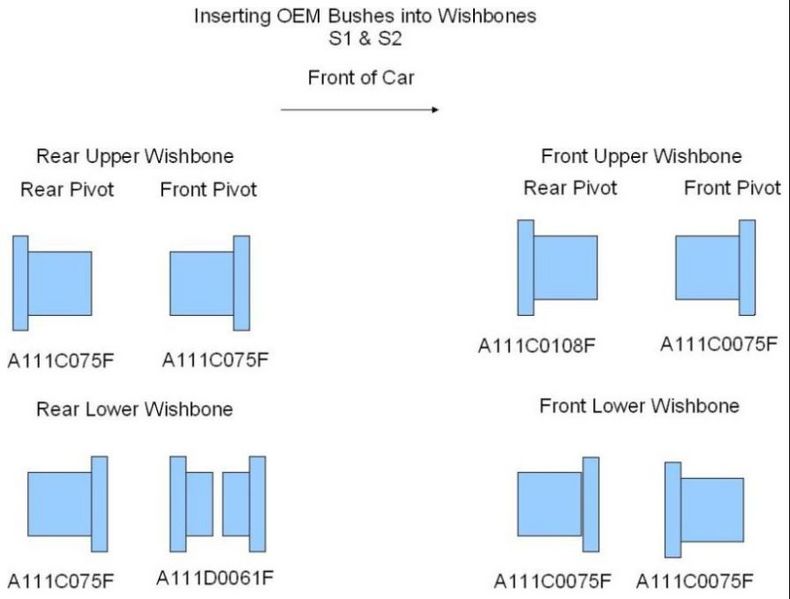
The bushes are directional. One owner asked whether they go in from the outside on the top arms and from the inside on the lower ones. The answer given was yes, and the owner who asked summed it up as uppers inside out, lowers outside in. A diagram on the Elise wiki was recommended as showing each pivot. The picture below is from that thread. It also shows the OEM bush part numbers at each pivot.
Torquing at ride height
Tighten the wishbone bolts with the suspension at ride height. If you tighten them with the wheels hanging, the rubber between the inner and outer parts of the bush twists and tears when the car is lowered. Rubber bushes (OEM and similar) need this; poly bushes can be tightened at any height, according to one owner. Support the car on stands under the wishbones or on its wheels at normal ride height, then tighten. See Torque values for torques, and check the figures against TIS.