
A clonk or play in the steering is often blamed on the rack, but it is more often somewhere else. This guide starts with finding where the play is, then covers which rack you have, which replacements fit, and how owners refurbish a Titan rack. For taking the rack out and putting it back, see Steering rack replacement. For the outer joints, see Track rod ends and rear tie rods.
Is it the rack?
One owner with a 2003 NA at 93,000 miles had a clonk from the rack area and solid track rod ends. These are the checks and causes from the thread, in the order they were suggested:
- Hold the column. Put locking pliers on the steering column under the dash and turn the wheel lightly in each direction. That shows whether the play is in the column and intermediate shaft or further down.
- The universal joints are the usual cause. The play often comes from the joints on the secondary (intermediate) column section, either the joint itself or the splined connection on the shaft having worked loose. In the second case you can sometimes tighten the pinch bolts a little.
- Less common: the upper column. A nylon insert fixes the telescopic parts of the upper column together. Over time it can fail, and then the upper and lower sections wiggle. You would find no play in the intermediate shaft or its joints with that section held still, but play in the steering wheel.
- The rack itself. Play or a clonk from the rack is usually the plastic cups in the ends of the rack having fractured or worn, so the ball joint on the end of the steering arm becomes loose.
- Also check the rack raiser plates and their bolt torque. One owner suggested this, and the owner with the 93,000 mile NA planned to do it next.
The owner with the clonk found the play came from the upper joint where it meets the shaft to the rack. He fitted a new Elise Parts shaft with both joints and the steering was fine again. The wear was on the splines of the middle shaft: he confirmed it by sliding the new shaft into both old joints, which was tight even without the bolt. He wrote that it might have been the rack as well, but after the new shaft and joints the steering was "all good". There is more on the intermediate shaft joints in Steering rack replacement, and on choosing and fitting the joints in Steering column universal joints.
Which rack have you got?
Two makes of rack were used on the VX220. The threads don't agree on how the cars were fitted, so look at yours.
| Titan | Sona | |
|---|---|---|
| Looks | One-piece cast aluminium main section | Tubular top section, part steel and part aluminium on the outer tube |
| Origin | The original rack, sold by most aftermarket sellers | Fitted to later cars |
| Serviceable | Yes. "The most serviceable of the lot." Titan sell spares | Said to be built less well and not serviceable. One owner had one rebuilt with uprated metal cups |
- One owner said the VX220 has Titan racks, and that Lotus used Titan for a short time in the S2's life. Another said he wasn't sure whether any VX220s had a Sona from the factory, though some may have received one when a rack was replaced. A third said the rack supplier changed during VX production. We don't know the date or chassis number of a change, if there was one.
- The two are said to be compatible with each other.
- Before refurbishing, check which one you have: both were used on the VX application.
- For a Sona, one reply said it is a replacer, not something you repair.
- One owner said the early Titan rack has a brass bush just behind the gaiter at each end, and that these are no longer available. He serviced his own with Titan's overhaul kit.
Do Elise and Exige racks fit?
- One owner checked a parts catalogue (DeRoure) and found part number A117H0052F is common to the Elise S2 (2001, 2004 and 2011), the Europa, the Exige S2 and the Exige V6. The Elise S1 rack had a C111x part number, later replaced by the same number. It isn't an A116 number, but the owner noted that Lotus appear to supply one rack across all these cars, including the Europa, which is the most VX-like.
- A VX220 parts site lists one rack for all of these cars. The owner who asked concluded the rack is common to the VX and the Lotus models, but this was his working assumption.
- Titan's own standard right-hand-drive rack number was posted as A11-610-101-01-A1, taken from a PDF on their website.
- Check the joint positions first. One owner said that once you have bought a rack you should compare the length and location of the two articulated joints (the ball joints and cups) with the old rack. Remove the circlip on the rubber gaiter, draw the gaiter back and compare. They must be in identical positions, or you will get "very funny bump steer". He says almost nobody does this check.
- The Elise Parts quick rack is different. It has different travel, different steering arms and a different ball joint connection, with longer steering arms and the pivot points moved a little inboard to lessen bump steer. Standard Titan parts won't refurbish it.
Buying a rack or a refurbishment
- Prices go out of date. A new Lotus rack was quoted at about £590 plus VAT in 2016, though one owner got one cheaper through the usual supply route. A 2012 post gave Titan's standard and 2.5-turn racks as about £300 and £322 plus VAT. In 2020 one owner said a Titan guide showed a £100 service fee plus parts of £61, against another post saying components were about £30. Check what is current.
- Titan sell spares direct. Owners said they are friendly and helpful by phone. The minimum order is by value, not by number of parts, which put some people off. In 2015 one owner couldn't get a reply from Titan or Seriously Lotus, and a group buy of parts was suggested.
- What Titan don't sell separately: usually the pinion and the bushes it runs in. Replacing those takes more tools, and by then you would want a lathe.
- Buying a refurbished one: one owner bought a refurbished rack with new track rod ends on eBay, and found it was less than 2.5 turns lock to lock, so possibly a quick rack.
Refurbishing a Titan rack
Owners disagree about how hard this is, and whether it is worth doing yourself.
- Easy, by some accounts. "Just a case of drilling out a lock nut, undoing the nut and replacing the cup under it." One owner did his in a morning, including getting the rack out and back in. Another took it out and put it back in two evenings, then paid a professional for the refurbishment.
- Send it away, by others. Even an owner who had done it himself said that through choice he would send it away, and that the hassle of removing and refitting is such that you don't want to do it twice.
- A SELOC wiki page on refurbishing the rack was recommended several times as the how-to.
- Plastic cups crack. Several owners advise replacing them with bronze or brass ones, especially if you track the car.
The steps owners describe
- Take the rack out (see Steering rack replacement).
- Note where the lock nuts finish. One owner said they must end up in the same place, or you will be adding or reducing toe.
- Drill out the small pin that stops the cup retainer unscrewing, undo the retainer, and replace the cup under it. The new pin needs a fresh hole, because the old one won't line up.
- Lap the new cups in. Before fitting, lap each cup onto the ball end of the steering arm so it makes contact over the whole surface. A little time with a cordless drill, valve-lapping compound and the arm held in a vice does it.
- Fit the ball joints with a coat of sticky, soap-based, molybdenum-loaded grease, and tighten the covers and lock nuts to spec. One owner said the rod should need around 30 to 40 Nm of pull force on the end to move it on the ball joint (as written, and the unit looks odd for a pull force).
- Leave it for a day and check again. The cavity can become hydro-locked as you tighten the nut and lock nut, so the rods feel right at first, but after a day or so the pressure from the grease falls and they loosen. Repeat until the resistance stops changing.
- Optional: regrease the rack and pinion. One owner opened it up and packed it with grease while rolling the rack left and right to reach all the teeth. You need a very large spanner. You only need to press the pinion out if you are replacing it.
- Check the preload before refitting the rack (below).
Can the cups be changed with the rack on the car? One owner said they can, and that it has been done a few times. Another said you can't, because you need to drill the locking pin and then drill again for a new one, so the rack has to come out.
Pinion preload
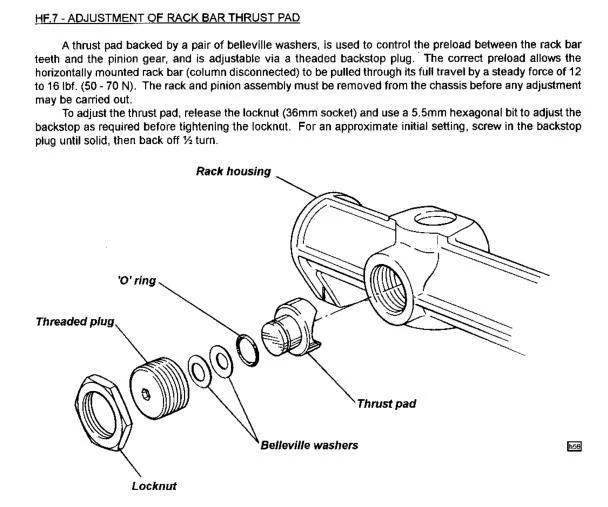
The page says a thrust pad, backed by a pair of Belleville washers, controls the preload between the rack bar teeth and the pinion. It is adjusted with a threaded backstop plug. With the rack on a bench and the column disconnected, a steady force of 12 to 16 lbf (50 to 70 N) should pull the rack bar through its full travel. The rack must be out of the car before you adjust it.
To adjust it, release the lock nut with a 36 mm socket and turn the plug with a 5.5 mm hexagonal bit before tightening the lock nut. For an approximate first setting, screw the plug in until it is solid, then back it off half a turn. One owner said new racks are often well out when delivered, and another said simply "check the preload" when a rack was being replaced.
How long does a refurbishment last?
- One owner's refurbishment, with bronze cups, lasted less than 5,000 miles before it started clicking again. He says not to refurbish, and to upgrade to a fast rack from Elise Parts: "do it once and do it properly".
- Another has done 10,000 miles on his, and says a correct refurbishment should last as long as when new. But because he used plastic cups, not bronze, he expects his to fail again, and suggests another type of rack.
- An Elise supplier told one owner in 2015 that refurbishments don't work, because the bushes the rack runs in wear too and can't be replaced.
Bent or worn inner tie rods
One owner with a bent inner tie rod asked whether they can be replaced without buying a whole rack. The answer was that it depends on the rack: with the early Titan rack you can get parts, and the later Sona is a replacer. Titan sell spares direct. The cups in the inner joint can be upgraded and need grinding in, as above.