
These steps start with the door panel already off. For that, see door panel removal. The original photos were lost from the forum, and three were restored in 2016 from an archive of an older page, which is what is shown here.
The three adjustments
The photos show the passenger door with the panel removed, numbered as in the original post:
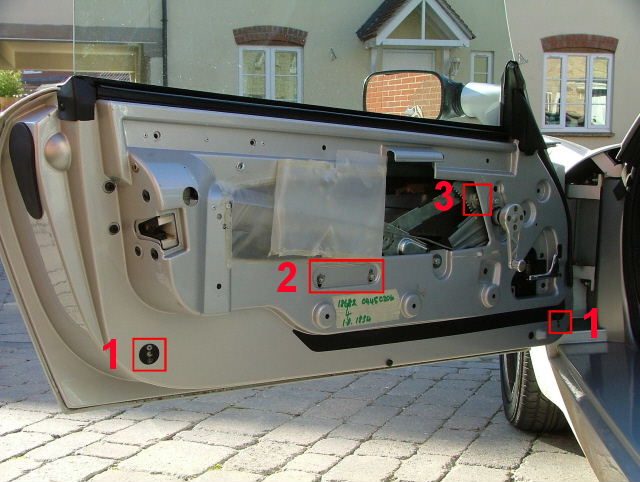
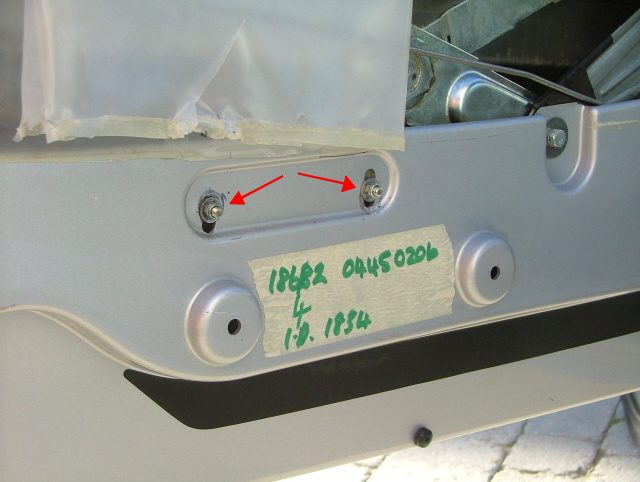
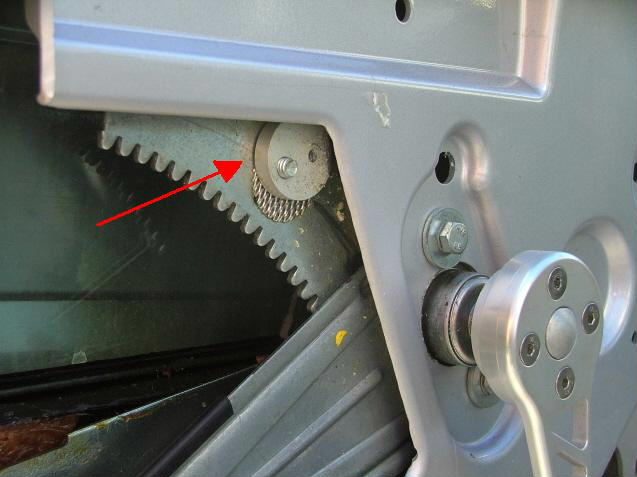
- No. 1: the tilt screws. These tilt the top of the window in or out, to the roof seals. There is one at each end of the bottom of the door. Only adjust these if you have to, and only slightly.
- No. 2: the two bolts. These raise or lower the front or back of the window, which also levels it.
- No. 3: the disc. It rotates to change the overall height of the window.
Adjusting the window height (the disc)
- Remove the No. 1 screw. Then loosen the bolt behind the disc from the back, without removing it, so that the disc can rotate. Note the disc's original position first.
- The disc pivots around the bolt and changes the distance from the bolt to the bar. To raise the window, swing the disc clockwise (increasing the distance from the bolt to the bar when the window is fully up).
- Retighten the bolt, check the window now fits the seal better, and when the position is right, refit the No. 1 screw.
- Check the window works and seals with the door open and closed, from inside the car, before you refit the panel.
On a car with a single bolt the job is: loosen the bolt slightly, rotate the disc, tighten it, close the door gently with the window up, and check the gap. It takes about 2 minutes.
Notes
Cars with only one bolt on the disc
Several owners found only one bolt on the disc, where the photos show two, and say not to worry about it. The bolt has a small, quite flat head on the other side of the disc (the thread you see poking through is the end of it), so you need to get a spanner behind it and fumble. Owners say 8 or 10 mm. One who got it done found his was 10 mm. Treat that as a guide, because the size isn't confirmed.

Getting the order right
- Level the window first. Use the tilt adjustment to get the window level. If the rear won't go up any further on the tilt, tilt the front down until it is level. Then use the disc to raise the whole window. Another owner gave the same advice: set the overall height first, then the tilt.
- It isn't logical. One owner moved the cam round a few millimetres and played with the two adjusting bolts to get the top seal right. He says they don't adjust in any logical order, so keep playing with them until it is sorted. It also cured his rattle.
- Running out of adjustment. One passenger window sat on the top seal at the back but was low at the front, and the bracket behind the two No. 2 bolts was already at full tilt. The advice was the level-first order above. No result was posted.
Setting the tilt screws by feel, and checking the seal
From an older (2003) thread about windows leaking after new roof seals were fitted. These sound like the No. 1 tilt screws, though the thread doesn't number them. It is a way of setting the front and rear screws without winding them in far.
- Wind the screws in by half a turn or a full turn, at the front and the back, then wind the window fully down and up again.
- If the window doesn't catch, go another turn and try again. When it catches you can feel it through the winder handle, or the window stops a couple of centimetres short.
- Once it catches, wind the screws back out half a turn. That should stop it catching, but still give a good seal.
Always do both the front and back screws, and always wind the window fully down and up. The catching is thought to happen because the glass is running too close to the lock mechanism. You don't need to screw them in far, which is how a screw ends up inside the door.
- Paper test: put a piece of paper between the window and the seal. It should grip the paper with the same tightness along the whole length, and the screws adjust this at the front and rear. This was read, not tried.
- Vaseline: a smear along the seals is said to improve them. It hadn't been tried, and the owner with the leak didn't like the idea of a smear along the top of the glass, so he kept it as a last resort.
- Leaks may not be the window. Before adjusting, make sure the water isn't coming from somewhere else, such as the panel with the wing mirror on it, or the base of the screen where it meets the dash. One owner's roof started leaking suddenly and a roof reseal fixed it.
- Roof seals changing the fit. One owner thought changing the roof seal had altered how the roof bars sit in the retainers, so the windows leaked more than before. Another blamed poor fitting of the seals, and says to go back to Vauxhall if a dealer fitted them badly. These are opinions, not tested fixes.
Grease the runners first
Re-greasing the runners solved most of one owner's problems. The top of the front runner was sticky, which bent the mechanism slightly and made the window lopsided as it went up. Do this before any alignment. The runners are very hard to see, so reach in and feel for them.
Window stuck up, or jamming
- A screw that has unwound. One passenger window was stuck fully up for almost two years. Looking in with a small LED camera showed nothing, so they removed the whole winder mechanism and the small black trim panel at the front of the door (two plastic fasteners). A screw facing forwards near the top front of the door had unwound enough to jam the glass. They tightened it with a screwdriver on a bendy drive, then reassembled, adjusted and checked the fit.
- Another owner had the same on an earlier car: the glass jumped the runner at the front because the screw at the top had come undone.
- A rattle from the front runner. One owner applied the trunking fix and still had a wobbling front runner. He asked whether it is normal for the screw into the front runner near the mirror to go into the groove, and got no answer.
If the glass is moving sideways on its guide rail, that is a different fix: see curing a rattling window.
If a screw falls into the door
A magnetic pick-up tool and triple-jointed arms will help. A pick-up tool may not be long enough, depending on which screw it was. Another option is a magnetic tool tray with a big rubber base: drag the rubber base along the bottom of the GRP door and the metal part follows.
One owner had the thread in the No. 1 adjuster fail. The bolt was fine, but the part it screws into, in the bottom of the window frame, had lost its thread and came out as a single piece. It isn't known whether it can be bought separately, or how it was fixed.
Refitting the door panel
- The two push-in screws in the handle part are hard to refit. Pull the screw part completely out of the plug part, push the plug in first, then the screw part.
- One owner uses a bit of double-sided tape instead of the screws, and says it has been as solid as the screws for a couple of years, and is easier to undo.