
This "idiots guide" was written in 2006 for anyone planning to retrim their door cards or adjust the windows (see adjusting the windows, which starts with the panel off). Almost all of its photos have been lost from the forum, apart from two that were restored in 2016, which are shown below. This guide therefore comes mainly from the written steps.
Part 1: the small panels and the winder
- Remove the screw on the side.
- Carefully pull off the small panel that is attached by three plastic clips. It is made from hard foam and breaks easily, so don't force it.
- Remove the three plastic clips from the panel, so you can reuse them when refitting.
- Remove the screw from the next panel.
- Remove the four Allen bolts from the window winder (the handle).
- Remove the Allen bolt from the centre of the winder. See the tip below if it winds the window down as you undo it.
- Start to release the large panel from the plastic clips that hold it to the door. Start from the back and work forwards, without breaking the foam.
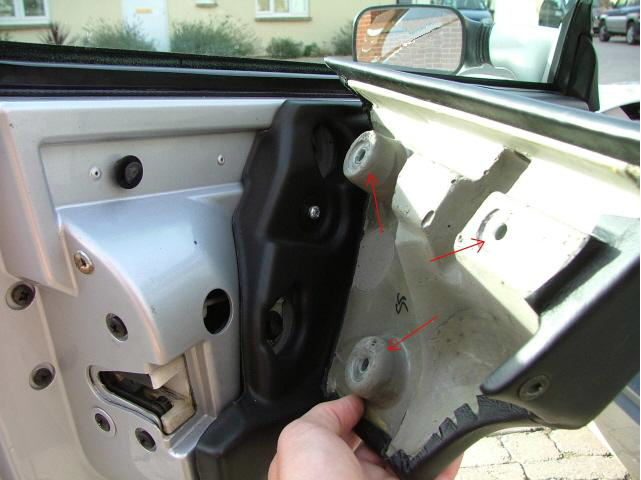
- Reach behind the panel and pull out the two plastic screws that hold the handle guard in place.
Part 2: the handle guard and the door cards
- Carefully ease the door panel away around the handle guard.
- Twist off the handle guard.
- The door cards are held on by six plastic clips. They crack easily if forced.
- If nothing breaks, you should be left with the separate pieces (the photo of them is lost).
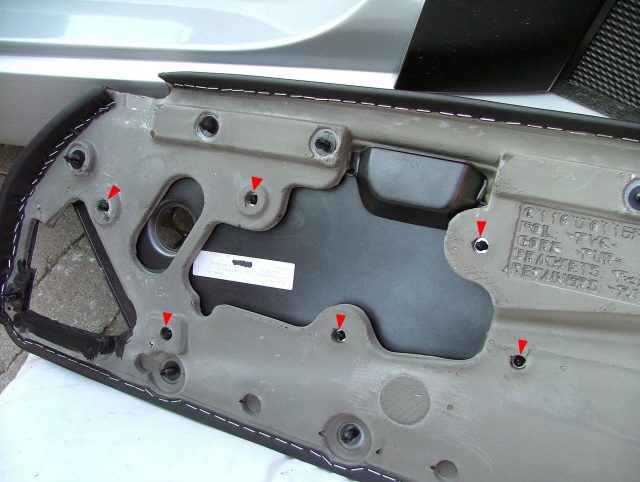
The author put the black panels back so he could keep using the car while the cards were off. He planned to cover the cards later and to stick them on with Velcro instead of reusing the six clips.
Tips from the thread
- Centre winder bolt winds the window down: when you try to undo the centre Allen bolt it can wind the window down, so you can't undo it until the window is fully down. That is normal. One workaround: reattach the winder with its two screws, leave out the centre cover, and then you can undo the centre screw.
- The black clips: some owners dislike them. It is easy to break the clips, and a clip along the top that doesn't catch leaves the trim sitting proud.
- Replacement clips: the ones that inevitably break are 30p each from Vauxhall (a 2007 price).
Refitting: the handle guard
Refitting the handle guard is where people struggled. The two push-in "screws" have a screw part and a plug part. Pull the screw part completely out of the plug part, push the plug in first, then push the screw part in. One owner couldn't do it. Once the panel and guard slot together, the gap closes so you can't get either the plug or the screw in, and if the guard is fitted first the panel won't slot around it. He broke a retaining tab on the front of the guard and ended up refitting without the two screws. Another found it the easiest stage, under 20 seconds to pop the guard over the handle, rotate, align and fit, and said his must be different. Nobody explained the difference. A bit of double-sided tape instead of those screws has also been suggested.
Velcro or clips?
Owners disagree about Velcro:
- Against: the glue melts in the sun. One owner had only recently refitted the correct clips and cleaned off the glue, and said that next time he would take the panels off and not use Velcro.
- For: another has fitted the main panels back with heavy-duty Velcro, glued in place with good contact adhesive. Otherwise the Velcro is stronger than its own glue and rips off when you want to remove a panel. He also uses it on dash plates, the big door pads and number plates.
- One owner wondered whether new carbon fibre cards would be flexible enough to be pulled off against Velcro. No answer was given.
If yours is different
- No screw at step 1: one owner didn't have the side screw. No answer was posted.
- Metal screw instead of plastic ones: at the handle guard one car had a single big metal screw instead of the two plastic screws, and the owner couldn't see how to get a hand and a screwdriver behind to undo it. No answer was posted.
- Can you take the cards off without removing the whole black foam moulding? This was asked in 2007. The answers in the thread don't say clearly. The owner later used the "force method" on his second door.
Window problem after refitting
After a first attempt at adjusting the windows, the window wouldn't reach the top with the door shut: the owner had to open the door, wind it up some more and then shut it, leaving about a 3 mm gap. The cause was that he had set the tilt too high at the back. He took the tilt off so the window was level, then raised it about 3 mm, and it worked. See adjusting the windows.