
This is a 2007 write-up for the VX220 Turbo, based on the ZLET forum's guide for the same engine in the Zafira and Astra GSi. The author had done cam belts on other engines and expected this one to be among the hardest on such a tight engine bay. It turned out to be one of the easiest. He saved over £350 on a garage and says anyone with reasonable engine experience could do it from this guide.
This is for the 2.0 turbo (Z20LET), which has a belt. The 2.2 NA engine has a timing chain, not a belt, so this doesn't apply to it. The author also believes the belt change on the 2.0 NA engine in other cars is the same method.
Getting access
- Start with the engine cold. Disconnect the battery (the author left it on, but admits that was brave).
- Loosen the driver's wheel, jack up the car and put an axle stand under it as a fail-safe.
- Remove the rear undertray. From memory there are five bolts along the back, three either side and two Allen key bolts in the middle.
- Remove the driver's wheel and the wheel arch liner (four bolts at the rear and three plastic screws at the front).
- Remove the high-pressure duct from the intercooler to the intake manifold. There is a Jubilee clip at each end and zip ties in three places, which you cut off.
- Put a jack under the sump, with a piece of wood between, to support the engine.
- Remove the engine mount. It is held by three bolts on the engine side and one holding the rubber mount to the bracket. See Engine mount replacement for tips on stuck bolts and supporting the engine.
- Release the alternator belt tension by turning the central tensioner bolt clockwise. The tensioner moves round and the belt can be taken off. Then remove the tensioner pulley by undoing its bolt anticlockwise as normal.
- Remove the bottom alternator belt pulley from the crank pulley (four Torx bolts).
- Remove the top and bottom cam belt covers (two Torx bolts each).
"Access was actually not too bad" with the wheel arch liner and the top engine mount removed (another owner).
Setting the engine to top dead centre
- Find the mark on each cam pulley and on the crank pulley and mark them with a paint pen. They need to line up with the marks on the back of the cam cover and on the rear crank pulley cover.
- Taking the spark plugs out first makes the engine easier to turn, and is a good chance to check them. Slide and lift off the black engine cover, disconnect the coil pack connector, remove the coil pack (two Torx bolts) and then the spark plugs.
- Turn the crank pulley clockwise until all the marks line up at TDC on cylinder 1. The crank mark is a depression in the bottom pulley, at 6 o'clock, which lines up with a notch on the back plate. The cam pulleys have notches at 12 o'clock with notches in the housing behind. If the cam pulleys come out 180 degrees away, turn the crank one whole revolution.
- Fit the cam locking tool. It is a tight fit and the cams may need a little gentle rocking to get it in.
- Before removing the belt, count the teeth between the two cam pulley marks. Without the locking tool this is essential, because it is easy to have everything almost aligned with the belt one tooth out. With the tool it matters less, since the cams can't move.
Why never anticlockwise? The thread asked this and nobody answered. The author's rule is simply to always go clockwise. His own crank marks were slightly out (about 4 mm) when he lined everything else up before removing the old belt.
Removing the old belt and fitting the new one
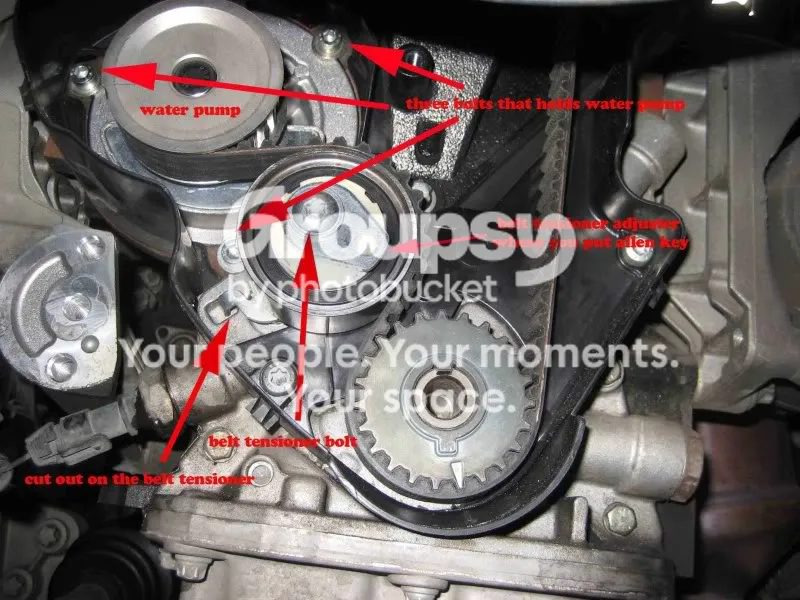
- Slacken the central tensioner bolt, then turn the adjuster clockwise to slacken the belt, using a 6 mm Allen key in the Allen key hole. Take off the old belt, then the old tensioner.
- Fit the new tensioner, but don't tighten its central bolt yet.
- Check for oil and water leaks while you can see everything, and repair as necessary. Make sure the crankshaft hasn't moved.
- Check the two idler pulleys for play and that they spin freely. The author replaced his anyway as part of the kit. Take note which way round they go, because the two are opposite to each other.
- Fit the new belt. Don't rush: getting every mark right and the same number of teeth between the cams can take a while. The belt goes round the bottom crank pulley, then the tensioner, then the water pump, up past the idler rollers, over the cams and back down.
- Turn the Allen key in the tensioner anticlockwise until the pointer reaches the "NEW belt" marker. Always tighten the tensioner anticlockwise.
- Check the timing marks are still aligned. The crank pulley turns slightly as the belt is tensioned, so you may need to start with the cam pulley slightly out. If the marks don't line up, release the tensioner and try again.
- Tighten the central tensioner bolt, then remove the cam locking tool.
- Turn the engine two full turns clockwise to TDC. Check all the marks line up and the tensioner is where you set it. If not, refit the locking tool, loosen the central bolt, release the tensioner and start again.
If the tensioner won't reach the "new belt" mark
One owner spent two days on this. The thread's answers were:
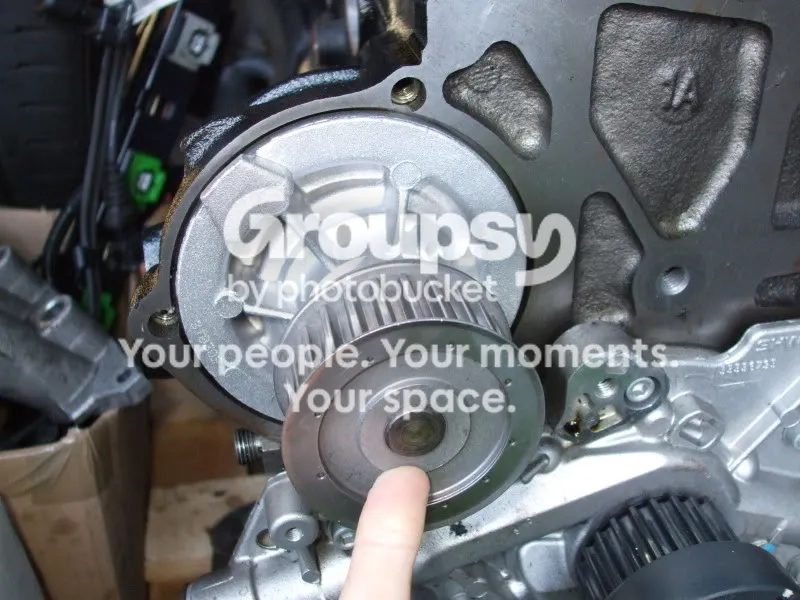
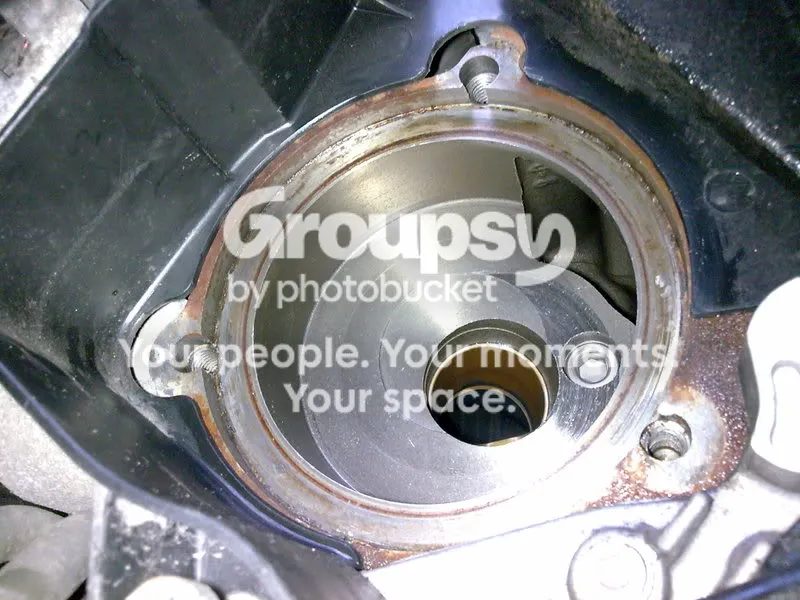
- The water pump may not be located correctly. This turned out to be the cause. The lug on the pump casting should point to about 11 o'clock, onto a bump on the cam belt cover and block, and the pump is moveable. Check it is seated before blaming the tensioner. The PDF guide he used didn't mention this.
- Don't push the Allen key so far in that it goes through into the blue plastic part. If it locks itself into the blue ring, it won't tension the belt.
- Make sure you are letting the tensioner fully out before tightening it.
Putting it back
- If all is well, refit everything in reverse order.
- After refitting the top and bottom cam covers, it is worth starting the engine to make sure nothing rubs. Make sure the car is stable and all tools are clear first. Don't run it for long like this, since the alternator isn't charging the battery.
- Refit the bottom alternator belt pulley, the tensioner pulley, the engine mount, the alternator belt, the intake pipe (with new zip ties), the wheel arch liner, the undertray and the wheel.
- Start the engine and check all is well.
The author reports the slight flat spot he used to feel at 4500 rpm went away afterwards. He wondered whether the cam timing had been slightly out before, or the car was just running in at 25,000 miles.
Other owners' notes
- Change the water pump at the same time. It can be done without removing the rear clam.
- Use a genuine Vauxhall pump. One owner had trouble with the vanes on a pattern pump, which only showed up on the track.
- Cam belt kits: one owner noted two kits are listed. The pre-2003 one (93174265) has two nylon tensioner pulleys, and the later one (93185844) has one metal and one nylon. A 2004 car was told it needed the earlier kit. Whether the later kit can be fitted to an earlier car wasn't answered in the thread. Check with a Vauxhall parts supplier for your car.
- Torque values are second-hand from the Haynes manual (above). Check them against the factory manual if you can.