
Replacing the brake and clutch fluid is aimed at people with some mechanical knowledge, but is simple enough for most to do. It is the same job on NA and Turbo cars.
Making a pressure bleeder
One owner made his own instead of paying about £120 for a bought one. You can now buy an Easybleed-type pressure kit for a fraction of that, which saves the faff, and one owner who used one called it a walk in the park.
- Buy a garden pressure water sprayer (about £12 then), a second-hand brake fluid reservoir cap from a Vectra (about £2) and some Araldite.
- Cut the end off the sprayer and measure the diameter of its hose (9 mm).
- Drill an 8 mm hole in the reservoir cap and push the hose through it. Leave about an inch sticking through, and Araldite both sides to get a good seal.
- When it is dry, test the system by screwing the cap onto your reservoir and pumping in some pressure. Listen for air leaks from the cap. Even the slightest can cause problems.
Preparation
- Before you jack up the rear, make sure you can reach both front bleed valves. If a wheel is in the wrong position the spokes can stop easy access.
- Remove the rear undertray, chock the front wheels, and jack up the car from one of the rear jacking points. Put an axle stand under the other point and lower the jack so the car is level and both rear wheels are off the ground. Remove the rear wheels. The undertray comes off so you can do both rear sides one after the other.
- You may not need to do any of this. Several owners bled all four corners without jacking up or removing wheels (on Speedline wheels, NA wheels and standard Turbo wheels), and one says it is better to leave the undertray on, as there is somewhere to put the catching bowl.
Optional: clean out the reservoir first
The most contaminated fluid is in the reservoir, and there can be thick jelly in the bottom that you don't want to push into the system. To avoid this:
- Cut the zip ties holding the reservoir in place.
- Pull the reservoir off and up.
- Remove the filler cap and tip the fluid away. The hoses are still attached.
- This is a chance to pull the hoses off and clean out the reservoir, which looks nice and clean when refilled with new fluid.
- Reattach the hoses, refit the reservoir and fill it ready for bleeding.
No air is introduced, because the reservoir is the highest point in the system. You also start flushing new fluid through straight away, rather than pushing contaminated fluid from the reservoir through.
Using a bought Eezibleed
The manufacturer's instructions are poor, and an online video helps. The steps match the home-made method, with these extras:
- The air supply is a spare wheel. The tyre pressure must be no more than 15 psi. 10 psi is typical, and over 20 psi will damage the Easybleed. The bleeder valve goes on the tyre valve.
- Prepare at each corner: wheel off, dust cover off the bleed nipple, loosen it, and push the tubing on. Use a small spanner and tubing to suit the nipples, and a fluid catch container (a "one man bleed" pot has the right tube and a big pot).
- Reservoir: pull as much old fluid as possible out of the reservoir with a syringe and top up with new fluid. Fit the right-sized Eezibleed cap onto the reservoir, fill the Eezibleed bottle about three-quarters full with new fluid and tighten the bottle onto the cap (not the cap onto the bottle).
- Order: passenger rear, driver's rear, passenger front, then driver's front. The author says it might not be the "right" order, but he has never had problems with it.
- Open the nipple and wait for fluid. If you are replacing old black fluid, you can see when it has gone, because it changes to the colour of the new fluid. After replacing lines or a caliper, wait for fluid with no bubbles. If the fluid was recent and clear, use your own judgement. Shut and open the nipple periodically.
- Keep an eye on the level in the Eezibleed bottle, because you don't want to bleed air into the system. Two owners ran it dry on their first caliper, and one had the pipe in the bottle come off the lid. Make sure the pipe is attached to the lid.
- Go round twice if you have enough fluid. One owner likes two laps. Another did one and asked if a second brought out any more air, and got no reply.
- Do the clutch last, see below. Then check every nipple is tight, remove the tyre valve connection, take the reservoir cap off and syringe out the excess to get the level right, refit everything and test the pedal.
Tip: if you are changing from very old fluid to an expensive fluid, flush first with a compatible cheap fluid and then run the good stuff through.
Other owners' experience
- Inverting the calipers. Some owners turn the calipers over to bleed them, which only takes a couple of bolts out. The author has never bothered. One owner inverted the fronts and had the wheels off anyway, because dripping brake fluid on them can mess up the paint.
- A leaky kit. One owner's Eezibleed isn't perfectly air or liquid tight, so he kept topping up the reservoir instead of putting fluid into the bleeder.
- Results. One owner didn't expect air bubbles because the brakes felt fine, but found some, along with muddy fluid. Afterwards the brakes were more progressive, and the clutch felt lighter (he says it may be imagination). Another got a nice hard pedal. A third found some bubbles but not many, and no change in feel, though he is more confident in the brakes.
- Time and effort. Pour in fluid, screw it on the reservoir, open a nipple, wait a few minutes, close it and move on. One owner did it in no time and didn't take the fronts off, though another points out that you need the wheels off for a proper inspection anyway.
- Old method. One owner uses a flexible pipe with a one-way valve and an 11 mm spanner instead, running 1 litre of new fluid through before a track day and 500 ml after, with the wheels off to inspect pad wear. Another uses a larger Eezibleed with one-way valves on the nipples.
- Fluid choice (owners' opinions). One found ATE Super Blue stains the system and disliked the pedal feel, so he went back to a very low viscosity DOT 4, accepting a lower temperature rating and more frequent changes. Another lasted about three months on it before returning to RBF600. A third found Mintex OEM grade 5.1 lasted longer than the ATE. These are individual preferences, and nobody quotes a boiling point.
Bleeding the brakes
- Reattach the bleeder with fluid in it and pump in some pressure. About 20 pumps worked fine. With a pressure bleeder you don't need to pump the brake pedal.
- Start at the rear passenger side wheel. Remove the rubber cap from the bleed valve and push the clear hose onto the end of the valve, where it fits perfectly. Put the bowl under the other end.
- Open the bleed valve with the 8 mm spanner. It is a screw type and only needs about one full turn to start the flow.
- Watch the old fluid drain out through the hose. When it changes from black to yellow, close the valve and remove the hose. Dry any fluid off the caliper and refit the rubber cap. The first caliper takes the longest, because it drains the old fluid from the reservoir.
- Repeat at the rear driver's side caliper, until new fluid runs through.
Bleeding the clutch
The VX uses the brake reservoir for the clutch too, so the clutch needs bleeding as well. It is wise to do the clutch after the brakes, and it is worth doing if the fluid is black.
Finding the valve. Look at the top of the engine bay, where the gearbox is on the passenger side of the engine. Two black pipes run over the top of the box near the engine, and the valve is around there. One owner took about 20 minutes to find it, and two others couldn't find it, or found it a pain, on supercharged cars with an alloy catch tank in the way. The photo below is of the Turbo.
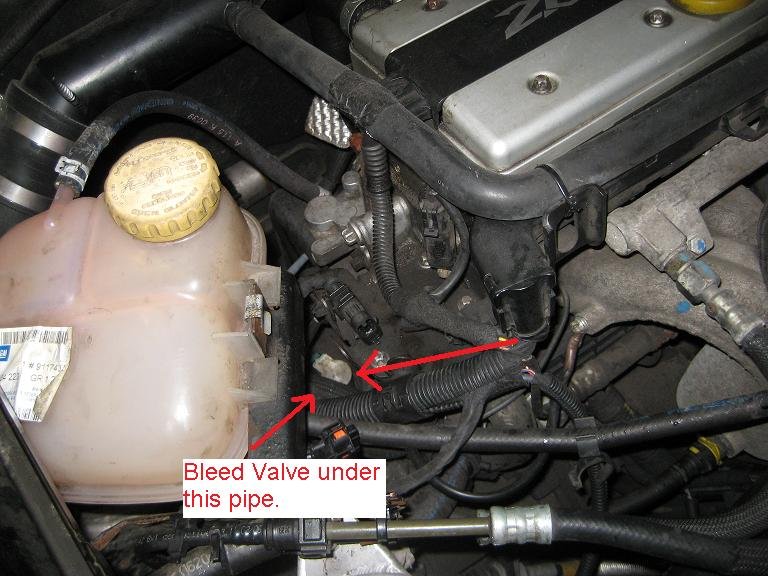
- The clutch bleed valve is on top of the gearbox, towards the passenger side, with not much room in the engine bay. It is hidden by a hose leading to the auxiliary water pump.
- From underneath, feed the clear hose in at the front of the gearbox, from the passenger wheel arch, and put a bowl under it to catch the fluid.
- In the engine bay, remove the rubber cap from the valve and fit the hose. Open the valve with a 6 mm spanner (an adjustable one works if your spanners only go down to 8 mm).
- Watch the fluid until the new fluid comes through. Close the valve, dry up any excess, remove the hose and refit the rubber cap.
Front brakes and finishing off
- Move to the front passenger wheel and repeat the procedure through the spokes. Be careful not to spill fluid on the wheels.
- Do the driver's side the same way.
- The black fluid in the reservoir should now be gone and the system full of new fluid.
- Release the pressure on the bleeder, which should suck the overfill out of the tank, then unscrew the bleeder. One owner found that an Easybleed leaves the reservoir full to the top, so he used a small bottle to take some out and bring it back to the advised level, just the top part of the range.
- Refit the car's reservoir cap, put the rear wheels back on, remove the stand and jack and refit the undertray.
Common questions
- Do you need a Tech 2 for the ABS? One owner asked if a special program has to run to flush the ABS system. Another said it isn't a problem and thought it was a myth to take cars to specialists. The point made was that fluid sitting in the ABS pump, valves and pipes isn't replaced. The ABS fluid is only an issue if you are bleeding manually and introducing air, and a pressure bleeder avoids this.
- Don't blow the fluid out with air. One owner tried emptying the old fluid by forcing air through and had to fix it afterwards with the normal bleeding technique.
- Replacing one caliper: attach the pressure bleeder, then clamp or bung the hose to keep the pressure and fluid in while you remove the caliper (fluid will pour out, so be quick). When the new caliper is on, unclamp the hose, reattach it and bleed that caliper using the valve on top. As long as the bleeder is on with plenty of fluid and pressure, you shouldn't introduce air before the caliper, and the other corners won't need bleeding. See Rear brake caliper strip-down if you are working on the rears.
- Fitting braided brake hoses: don't drain the caliper. Remove the old hoses one at a time, attach each new one at the car end (not the caliper) and bleed fluid through to fill it, then attach it to the caliper. Do this at each corner, then bleed all four. This introduces the least air.
- Bleed nipple torque: no figure was given. The advice was to nip them up gently.